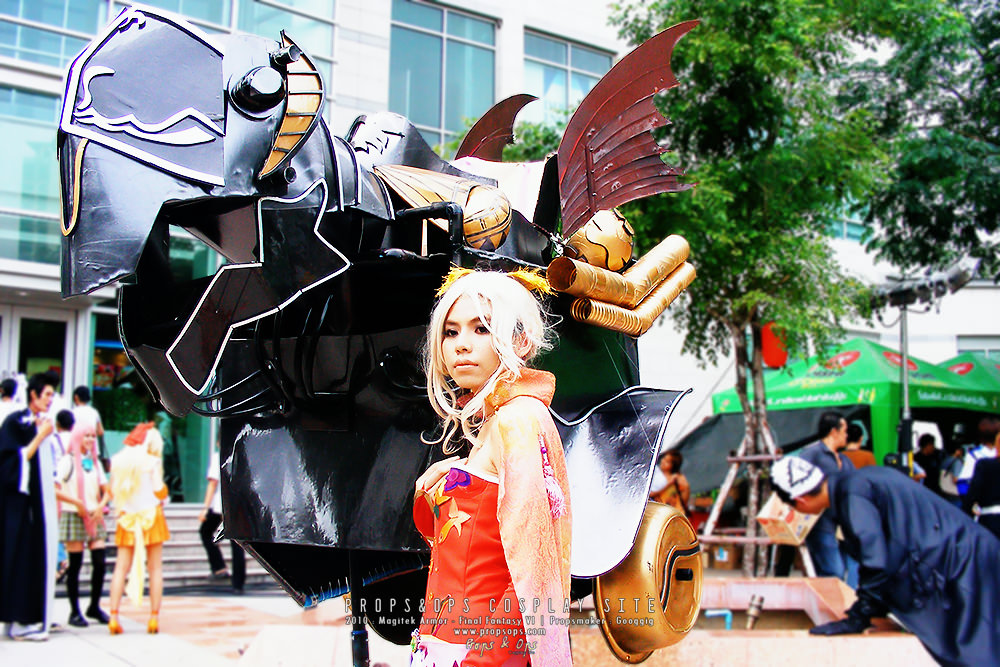
เริ่มต้นจากการสร้างโครงด้วยท่อ PVC โดยออกแบบคำนึงถึงข้อต่อ และขนาดกว้าง ยาว สูงที่พอจะเดินเข้าออกประตู หรือขึ้นรถได้เวลาขนย้าย แล้วจึงเริ่มปิดแต่ละด้านด้วยโฟมยางโดยใช้เชือกมัดรั้งไว้แต่ละด้าน ปืดผิวด้วยผ้าหนังสีดำโดยใช้กาวยางในการติด
ทำส่วนหัวโดยใช้โฟมยาง โดยมีโครงข้อต่อ PVC อยู่ด้านใน (เพื่อสามารถนำไปติดกับโครงหลักได้) ปิดผิวด้วยผ้าหนังสีดำ
ในส่วนต่าง ๆ นั้น ก็จะเป็นโฟมยางปิดผิวด้วยผ้าหนังสีดำ (หรือสีต่าง ๆ อื่น ๆ ตามแบบ) แต่ก็มีใช้วัสดุอื่น ๆ ประกอบ อาทิ ลูกบอลพลาสติกพ่นสเปรย์สีทองแล้วตกแต่ง กาละมังพ่นสีสเปรย์ รวมไปถึง ท่อด้านข้างตัวที่ทำมาจากขวดน้ำแล้วพ่นสีสเปรย์ โดยคำนึงเรื่องวัสดุที่มีน้ำหนักเบาที่สุดเท่าที่จะเอามาทำได้
แต่ในภายหลัง แม้จะพยายามคำนึงถึงน้ำหนักมาโดยตลอด แต่ก็มีน้ำหนักเกินกว่าที่คนจะแบกไว้เป็นระยะเวลานาน ๆ จึงได้สร้างโครงรับน้ำหนักขึ้นมาต่างหาก โดยใช้โครงราวอลูมิเนียม มาดัดแปลงผสมกับ PVC โดยมีล้อเลื่อนอยู่ในด้านล่าง ซึ่งก็ต้องเสริมความแข็งแรง เพราะล้ออาจจะรับน้ำหนักไม่ไหว
ทั้งด้วยปัญหาน้ำหนัก จึงได้ตัดสินใจเปลี่ยนบางชิ้นส่วนจาก โฟมยาง เป็น กระดาษแข็งบาง ๆ มาทำ โดยลอกผ้าหนังที่ปิดผิวผ้าหนังออก แล้วมาปิดผิวกระดาษแข็งบาง ๆ แทน เพื่อลดน้ำหนักลง ซึ่งก็ลดไปได้พอสมควร (แต่ก็เปลี่ยนไม่ได้ทุกส่วน เพราะบางส่วนก็จำเป็นต้องคงความแข็งแรงไว้)
ตกแต่งด้วยอะไรต่าง ๆ เช่น ผ้าหนังสีต่าง ๆ สายยางรดน้ำพ่นสีสเปรย์ครับ
รายละเอียดจริง ๆ มีอีกมากจริง ๆ จะพยายามอธิบายเพิ่มเติมตามรูปประกอบด้านล่างนะครับ
จะว่าไปอุปกรณ์ชิ้นนี้นั้น เหมือนหาเรื่องใส่ตัวมาก ๆ เลย เพราะแต่ละส่วนของเมจิเทคนั้น แทบจะเรียกว่า เหมือนทำอุปกรณ์เสริมแต่ละชิ้นเลยทีเดียว เพราะมีขนาดใหญ่มาก และต้องคำนึงถึงอะไรหลาย ๆ อย่าง ตั้งแต่ ความแข็งแรง ความเหมือน น้ำหนัก ความสวยงาม ความสะดวกในการขนย้าย งบประมาณการทำ ฯลฯ
และเพราะขนาดที่ใหญ่ขนาดนี้ จึงทำให้รู้สึกว่ามีพื้นที่ที่ต้องเก็บรายละเอียดค่อนข้างมาก เก็บเท่าไร ๆ ก็รู้สึกเหมือนไม่เสร็จซะที สำหรับอุปกรณฺชิ้นนี้ใช้เวลาประมาณ 2 เดือนในกาารทำครับ
[English Text by Silfer]
Starting by create the inner structure with pvc pipe. I have to be careful about the size of each inner structure parts because it could be too big to go through the doors or put into the truck. After the inner structure is done, then I started to cover each side with linoleum sheet along with strapping with ropes (as shown in the picture). Cover it once again with black leather fabric using the silicon glue.
The head part was made by rubber foam structured by pvc pipe (so that it could connect to the body part easily). Again, cover each side with black leather
Other parts were also made by rubber foam covered with black leather fabric (or other color depending on the part). Some details were made by other materials. For example, plastic football for body decoration, wash basin for the foot parts, and plastic bottles for the side body decoration. These materials were decided with biggest concern on the total weight of this armor.
However, even with my biggest concern on net weight of this armor, it was still too heavy for a person to carry for a certain period of time. I, then, had to create inner rack to support more weight. The inner rack was made by using both aluminum bars and pvc pipe to make a structure, and then, supported with wheels on the bottom.
Lastly, I changed some parts that were made by rubber foam into just cardboard in order to reduce more weight of this armor. Some parts that were covered by leather fabrics were also changed into normal cardboard as well. (Most of the changed parts are decorations. Some other core or major parts were remained the same.)
Other minor parts were decorated by leather fabrics and water hoses, for example.
There are still much more minor details, which could be seen from the pictures posted below.
Actually, this prop is truly troublesome. Magitek armor is like a big armor containing small individual props inside. Each part is just as troublesome and time-consuming like one normal prop. Moreover, there are so many factors to be considered while making this armor such as weight, delicacy, ease of transportation, fund, and etc. Because of its size, I feel like it is impossible to finish all of the details of this armor since it is so big and complicated.

|
Date: 27 มิถุนายน พ.ศ.2553 | 27th June 2010